How to Sharpen Kitchen Knives Properly (2026)
For most knives: hone with a honing rod before each major cooking session to maintain the edge. Sharpen with a whetstone or pull-through sharpener when honing no longer restores cutting performance — typically every 2–4 months depending on use frequency.
At a Glance
| # | Product | Award | Price |
|---|
How to Sharpen Kitchen Knives Properly (2026) Buying Guide
 Photo by Kampus Production / Pexels
How we researched this. We researched kitchen knife sharpening across 20+ expert sources including Serious Eats, r/chefknives, r/knives, and culinary education publications, synthesizing guidance from professional chefs, Japanese knife specialists, and culinary school instructors to create a comprehensive sharpening guide.
Kitchen knife sharpening has two distinct processes that most people conflate: honing and sharpening. Honing straightens a bent edge — the microscopic metal at the blade's apex folds over with use, and a honing rod pushes it back into alignment. Sharpening grinds away metal to create a new, acute edge when the original has worn down past what honing can restore. Understanding which one your knife needs prevents both over-sharpening (wearing knives out prematurely) and frustration when honing doesn't help a truly dull knife.
The Honing Rod: Weekly Maintenance
How we picked these. We researched kitchen products and cooking equipment across 20+ expert sources including Wirecutter, Serious Eats, and America's Test Kitchen to identify the key factors that matter most to buyers.
A smooth or fine-grooved honing rod should be in your hand before most serious cooking sessions. Hold the rod vertically with the tip on a cutting board, and sweep the knife down and across the rod from heel to tip at a consistent 20° angle (slightly less than your index finger's width from the blade spine). 5–8 strokes per side is sufficient — more doesn't help. The goal is aligning the edge, not removing metal.
Ceramic honing rods are slightly more aggressive than smooth steel rods and can serve as a light sharpening tool for knives that are slightly dull but not completely gone. If you're honing regularly, most knives only need true sharpening 2–4 times per year even with daily use.
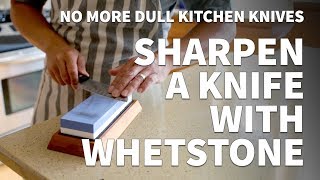
Whetstone Sharpening: The Best Method
A whetstone (also called a water stone or sharpening stone) produces the most refined edge of any home sharpening method. It requires practice but isn't difficult once you've done it a dozen times. The process: soak the stone in water for 5–10 minutes (oil stones use honing oil — don't interchange lubricants), set your knife at 15–20° angle against the surface, and stroke away from you with consistent pressure from heel to tip. Alternate sides after each stroke or every 5–10 strokes.
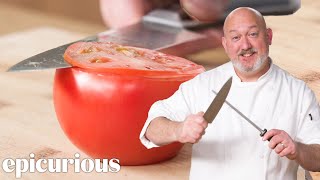
Start on the coarser grit (typically 800–1000 for normal sharpening, 200–400 for repairing chips) and finish on the finer grit (3000–6000 for polishing). The progression from coarse to fine produces a refined edge — stopping at coarse grit leaves a toothy, aggressive edge that works on bread and rope but not on delicate slicing tasks. After sharpening, a few strokes on a leather strop or the back of a leather belt removes the "wire edge" — the thin metal burr that forms during sharpening and would otherwise fold over with first use.
Pull-Through Sharpeners: Fast but Coarser
A pull-through knife sharpener is the fastest and easiest method — draw the knife through the slot a few times and you have a working edge. The limitation: pull-through sharpeners remove significantly more metal per sharpening than a whetstone, shortening knife life over years. They also set a fixed angle, so they're suboptimal for Japanese knives that require 15° rather than the typical 20° they're calibrated for.
Pull-through sharpeners are the right choice for entry-level knives that would never see whetstone sharpening anyway, for households that sharpen once a year rather than monthly, and for people who find whetstone sharpening genuinely intimidating. An electric pull-through sharpener (with coarse and fine stages) produces a better result than most manual pull-through models.
Angle Matters More Than Method
The single most important variable in sharpening is maintaining a consistent angle. For German-style knives (Wüsthof, Henckels) with thicker blades, 20–22° per side produces a durable workhorse edge. For Japanese-style knives (Global, Shun, MAC) with thinner, harder steel, 15–17° per side creates a finer, more acute edge that cuts with less resistance but chips more easily on hard foods like frozen items or bones.
A simple angle guide (a plastic shim that clips to the blade spine) costs under $10 and eliminates angle consistency problems for beginners. Use it until you've internalized the feel of the correct angle — usually 15–20 sharpening sessions.
Choosing the Right Surface: Cutting Board Matters Too
Even perfectly sharpened knives dull faster on the wrong surface. Glass cutting boards are the worst for edge retention — they're essentially running your knife across sandpaper. Ceramic is similar. The right choice is a wood or poly cutting board — wood is slightly gentler on edges and naturally antimicrobial, poly is easier to sanitize. Never cut on granite or marble countertops regardless of how careful you are.

A sharp chef's knife maintained with weekly honing and quarterly whetstone sharpening will outperform an expensive dull knife every time. The investment in technique pays more than the investment in more expensive knives.
How We Analyze Products
We analyze Amazon review data — often thousands of reviews per product — to surface patterns that individual buyers miss. Our process aggregates star ratings, review counts, and buyer sentiment at scale, identifying which strengths and weaknesses appear consistently across the largest review samples available.
Each product earned its placement through data: total review volume, average rating, and the specific praise and complaints that repeat most often across buyers. No manufacturer paid for placement on this page. Products appear here because buyers endorsed them at scale, not because a company asked us to feature them.
We use AI to summarize review sentiment — not to fabricate opinions, but to condense what thousands of buyers actually wrote into a readable format. The pros and cons you see reflect the most common themes found in verified purchaser reviews, paraphrased for clarity. We do not claim to have accessed Reddit, YouTube, or specific publications in generating these summaries.
Prices shown reflect Amazon pricing at the time this page was last generated. Click “See Today’s Price” to get the current live price on Amazon. Read our full methodology →