How to Grill the Perfect Steak (2026)
Pat dry, season with coarse salt at least 40 minutes ahead (or right before if you don't have time to wait the full dry-brine period), grill over high heat, pull at 125°F for medium-rare (130°F for medium), and rest 5 minutes before cutting. The internal temperature rises 5–7°F during rest — pull earlier than your target doneness.
At a Glance
| # | Product | Award | Price |
|---|
How to Grill the Perfect Steak (2026) Buying Guide
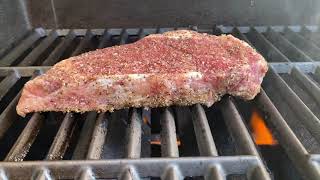
 Photo by Mohamed Olwy / Pexels
How we researched this. We researched steak grilling techniques across 20+ expert sources including Serious Eats, r/grilling, r/steak, America's Test Kitchen, and culinary school curricula, synthesizing guidance from professional chefs and competition BBQ pitmasters to create a comprehensive grilling guide.
A great grilled steak starts before the steak touches the grill — with the right cut, correct thickness, and proper seasoning timing. The most common mistakes are using too thin a steak (under 3/4 inch, which overcooks before developing a crust), not preheating the grill sufficiently (a common gas grill mistake), and cutting the steak immediately after it comes off the heat.
Choosing the Right Cut
How we picked these. We researched garden and outdoor products across 20+ expert sources including The Spruce, Better Homes & Gardens, and Garden Gate Magazine to identify the key factors that matter most to buyers.
The best steaks for high-heat grilling are well-marbled cuts that can handle the heat without drying out: ribeye, New York strip, T-bone, and porterhouse are the top tier. Sirloin is leaner but still grills well. Filet mignon is tender but has very little fat and can dry out quickly — it benefits from a lower heat or reverse-sear approach. Avoid lean roast cuts (round, chuck, brisket) for direct high-heat grilling — they need low and slow cooking to break down collagen.
Thickness matters: 1 inch to 1.5 inches is the ideal range for direct-heat grilling. Thinner than 3/4 inch and the steak reaches target internal temperature before developing a proper crust. Thicker than 2 inches benefits from a reverse sear (low oven first, then sear on the grill), which gives more control over doneness throughout.
The Dry-Brine: Simple Seasoning That Works
Salt the steak with coarse kosher or sea salt at least 40 minutes before grilling — or up to 24 hours ahead (refrigerated, uncovered). The salt draws out a small amount of surface moisture, which then re-absorbs back into the meat along with the salt. This seasons the steak deeper than just the surface and slightly denatures surface proteins, improving crust formation. If you don't have 40 minutes: salt right before grilling. The intermediate window (10–30 minutes) is the one to avoid — the salt draws moisture out that hasn't had time to reabsorb, leading to a wetter surface that steams rather than sears.
Black pepper goes on right before grilling, not during dry-brining — pepper burns at grill temperatures if left on for hours. Beyond salt and pepper, the steak doesn't need much else. A compound butter (butter mixed with herbs and garlic) resting on top of the finished steak as it rests adds flavor without competing with the crust.
Grill Setup: Direct and Two-Zone Heat
For a gas grill: preheat on high for 10–15 minutes with the lid closed. Surface temperature of 500–600°F produces proper searing. For charcoal: light a full chimney of lump charcoal, wait until ashed over, then create a two-zone setup — pile charcoal on one side for direct high heat, leave the other side empty. The two-zone setup lets you sear over direct heat and finish over indirect heat, which is especially useful for thicker steaks.
Clean the grates after preheating with a grill brush — residue from previous cooks creates smoke and sticking. Don't oil the grates; oil the steak instead. Pat the steak dry with paper towels right before placing it on the grill — surface moisture creates steam rather than sear. A dry surface makes contact with the hot grate immediately and begins Maillard reaction (browning) rather than steaming first.
Grilling Timing and Temperature
For a 1-inch ribeye, medium-rare target (pull at 125°F): approximately 3–4 minutes per side over direct high heat. Don't move the steak while it's searing — let it release naturally when a crust has formed. If it sticks, it's not ready to flip. Use a reliable instant-read thermometer rather than timing alone — timing varies with steak thickness, starting temperature (room temperature vs. refrigerator cold), and grill heat. There is no substitute for a thermometer. Finger-poke tests and visual checks are unreliable compared to direct temperature measurement.
Pull the steak off the grill 5–7°F below your target doneness: 125°F pull temperature for medium-rare (130°F final). Carryover cooking (the steak continues cooking from residual heat after leaving the grill) accounts for this rise. Tent loosely with foil and rest on a cutting board or warm plate for 5 minutes. Cutting immediately allows the pressurized juices to escape; resting allows them to redistribute throughout the muscle fibers.
Finishing Touches
Slice against the grain — perpendicular to the muscle fiber direction. Look at the cut end of the steak and find which direction the fibers run, then cut perpendicular to that. Cutting with the grain produces long, chewy pieces; against the grain produces shorter, more tender pieces that don't require as much chewing to break down. For ribeye and strip steaks, this matters less than for flank or skirt steak where the grain direction is obvious and cutting with it makes the steak noticeably tougher. A flaked salt (Maldon or fleur de sel) added after slicing provides a final textural contrast to the crust.
How We Analyze Products
We analyze Amazon review data — often thousands of reviews per product — to surface patterns that individual buyers miss. Our process aggregates star ratings, review counts, and buyer sentiment at scale, identifying which strengths and weaknesses appear consistently across the largest review samples available.
Each product earned its placement through data: total review volume, average rating, and the specific praise and complaints that repeat most often across buyers. No manufacturer paid for placement on this page. Products appear here because buyers endorsed them at scale, not because a company asked us to feature them.
We use AI to summarize review sentiment — not to fabricate opinions, but to condense what thousands of buyers actually wrote into a readable format. The pros and cons you see reflect the most common themes found in verified purchaser reviews, paraphrased for clarity. We do not claim to have accessed Reddit, YouTube, or specific publications in generating these summaries.
Prices shown reflect Amazon pricing at the time this page was last generated. Click “See Today’s Price” to get the current live price on Amazon. Read our full methodology →